
Hey all,
I am joining Tara at Fourth Grade Frolics for another Monday Made It!
This one has a picture overload. So sit back and relax!


I made a new set of crate storage seats. I can't wait to put them in my room.
They are such a great color! I am going to show you how to make them because once I had everything they literally took under an hour to make. :) ANNNNNDDD I did it by.my.self.
I said it - by.my.self. (I know myself is one word, but it didn't sound as good)

Ok here we go.
I had these crate seats from circa 1999 when I went away to college! They were in our storage unit so, I took them out and dusted them.


Here are your materials you WILL need.
Electric Staple Gun
Handheld Drill
3/4 in screws that have a point on them.
Seat cushions or foam. My cushions were from Walmart last year. $7
scissors
material (at least 30x55 in) I got 2 yards, but only used about half. You can get away with a yard and a half.
bins. I got mine at Joann. They were 9.99, but I had a 50% off coupon plus my 15% off teacher discount. They checkout lady was so nice she applied it to my vinyl and my bins. So I got everything for 19.00
An electric staple gun. I am sure you can do it without electric, but it hurt my hand with the power one, so I can't imagine the hand held. I have had it for a few years, so that was free.
Next up, the crate needs wood.
My crates lined up were 10.5x46.5
I went to Home Depot and showed my teacher badge and that I needed some wood. They had a nice piece for me for FREE YALL!
This was 3/4 of an inch thick. So you will want a 3/4 inch board.
My cushions were leftover from last years.

Line up the cushion against your wood. Trim the extra off the sides.
It should only take 2 cushions. You will have the extra (bottom right pic) left.

Take what is left and put it smooth not rough side together.
Then cover your material. I used Vinyl because their little feet are always on them. Fabric just stains.

Start to tuck under the wood. once you have it all tucked on one side, flip the board. Then fold the material.

Staple the material down all one side. Let the material hang over(bottom left)
Then cut along the edge and make sure you leave enough to fold under.

Staple it like you are folding a gift. Trim the extra off the edges and then fold that like a gift and staple again.

Then flip it over. Look how great it looks! The bottom left is all I had left over (minus the extra yard of material).
Place it right side on the floor, and line up your bins on top.
Top middles you will need 2 screws in each crate. Be sure that you press down after to ensure that your kids don't get stuck with the screw. Last year, I bought screws that were too long and had to redo!


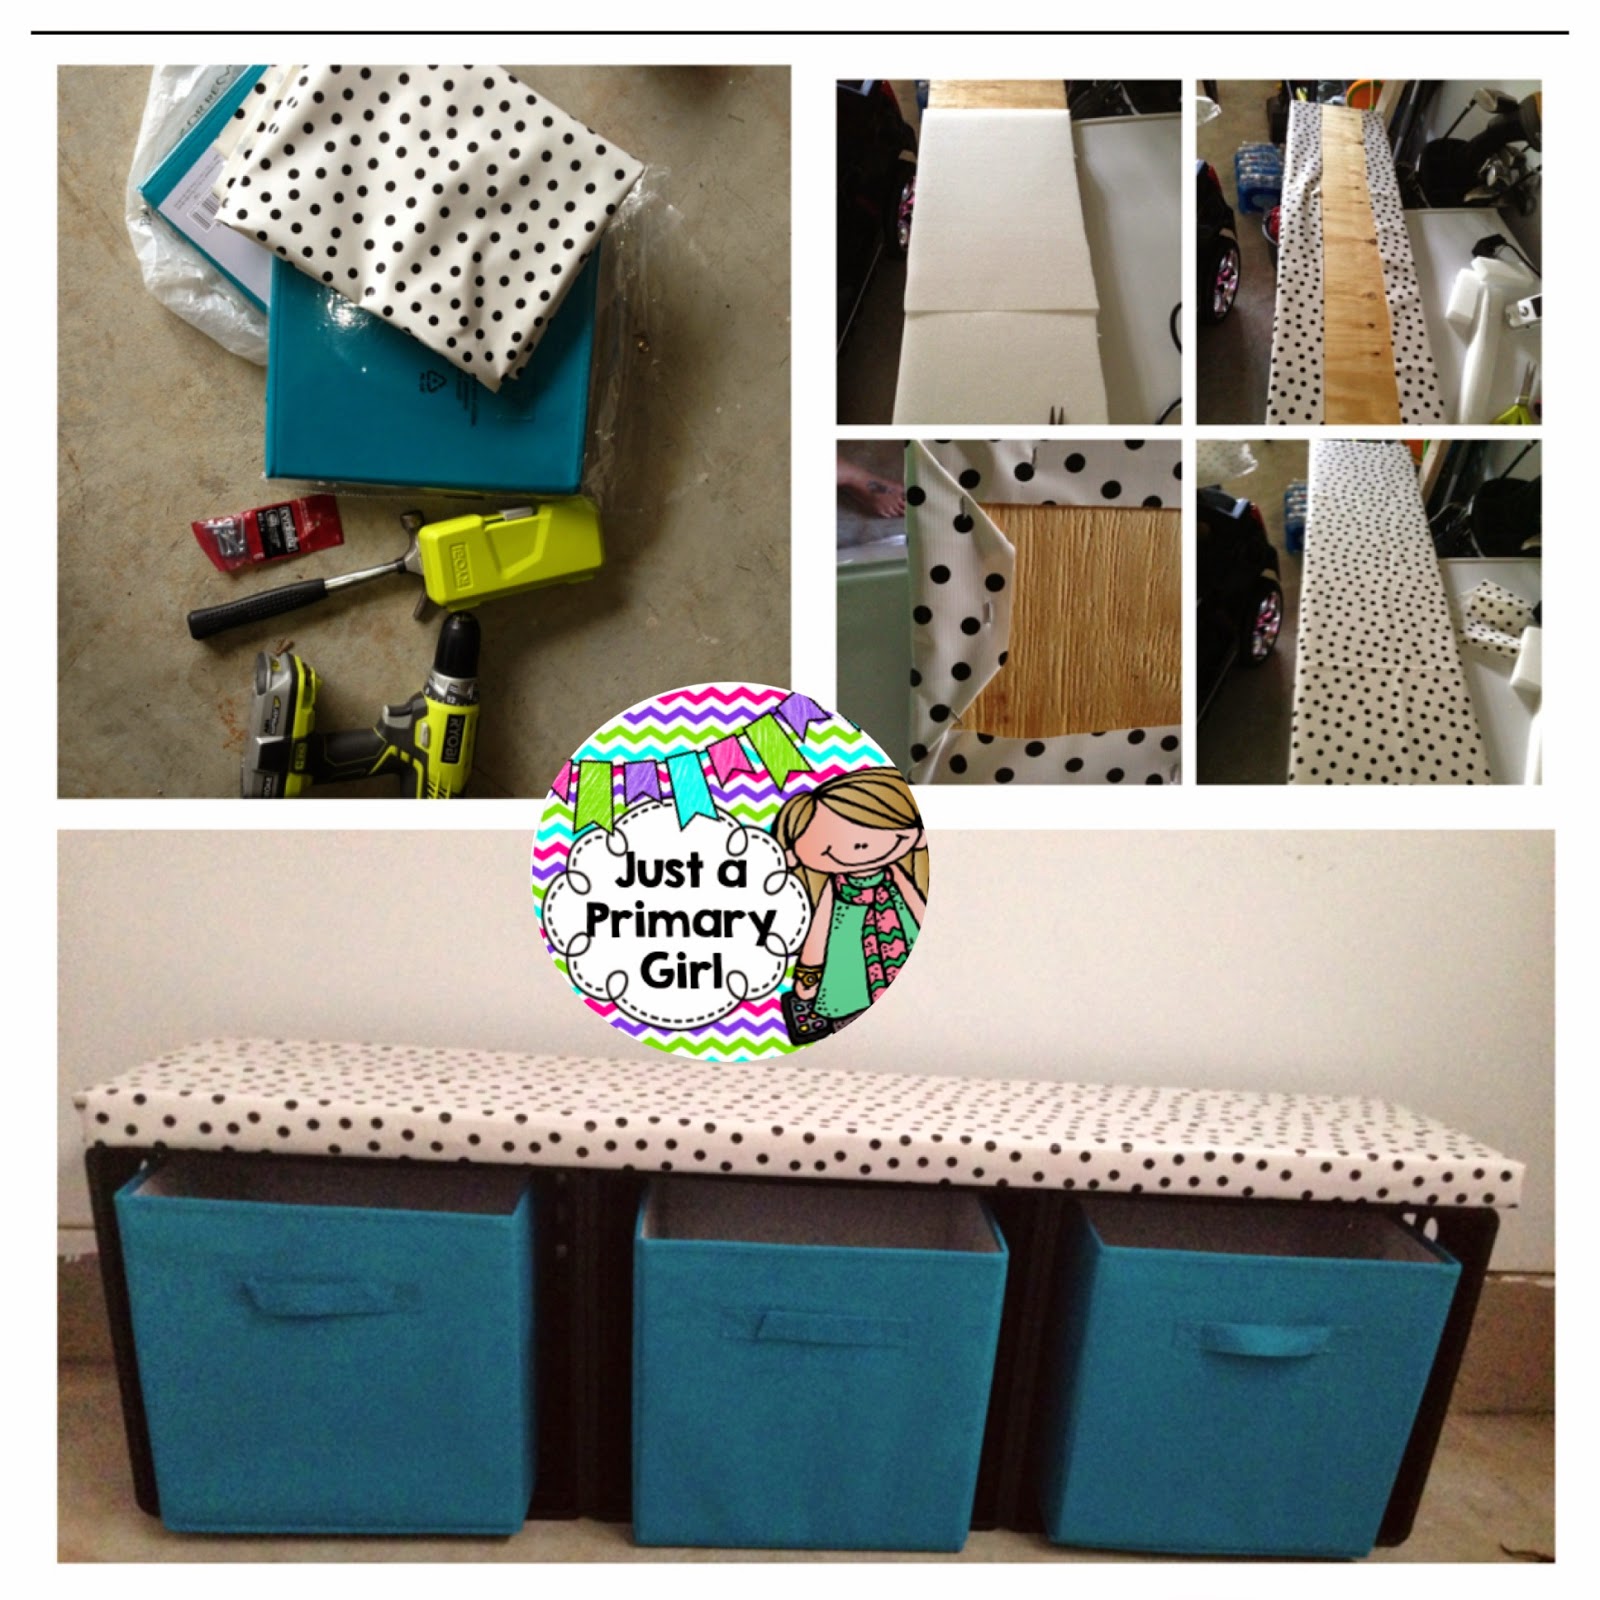
I just love how this turned out!

.jpg)
I went absolutely crazy trying to figure out how to organize everything and find things easily. So I went to target and bought as many tupperware bins as I could find that were purple of course! As I looked at this, of course, I wasn't happy. Sure clear means I can see through, but it looks messy and disorganized.
.jpg)

You can click on the above picture or below pictures to find the 15qt labels.


Ahhh, that is more like it. I made some cute labels for the 15 qt containers and also for the 6qt containers.

I also love me some dollar tree. I know you do too. They have these awesome square and rectangle clip on bins. Did you see them?

These are the rectangle bins from Dollar Tree.
You can click here or on the picture below to go to my store to find the rectangle bin labels.

Here is the rectangle one. I made three versions for you - Blue, Pink, and Purple. Click any of the pictures to see them in my store!


Here are the square bins

This is what the square bins look like with the label inside.
You can buy them here, or you can click on the picture below to go to my store to buy them.


.jpg)
Here was the Before again....

Now the after... What a difference. I am so thrilled about how it looks. I already feel organized.


This is my baby. I spent 1.5 hours putting this bad boy together all by myself! I am SO proud. It was in a MILLION pieces! I had my power screwdriver and away I went. So exciting!
I can't wait to decorate it. I call it a Made It, because I couldn't use it until I "made" it.
I have a few other things that I am working on, but I will save them for another day.
Leave your email address and a comment telling me what is your favorite way to organize, and I will enter you to win your choice of my Dollar Tree Square or Rectangle container labels in your color of choice. I will pick a winner on Tuesday morning at 9 am EST
Have a great day!


You have been so busy. I love it all. Now come do mine ... pretty please.
ReplyDeleteIt's official...I need to get to the Dollar Store. I NEED some new containers, so I can be organized like you!
ReplyDeleteAlison
Rockin' and Lovin' Learnin'
That organization makes me happy! I'm heading into my new room today, so I'll have to check out what kinds of storage I might need. I'll probably be off to the Dollar Store at some point, I'm sure :) Toooo cute!
ReplyDeleteFun in Room 4B
Your posts about your labeled closets and bins make me so happy! I just LOVE them. Seriously, if I could label everything in my house, I would. I really like how you made them all editable for teachers. Also, I like how you attached a cushion to the storage bins. It looks wonderful!
ReplyDeleteMeredith
Creativity to the Core
Wow, everything looks great! I am working on my room during summer camp and am going to try having my books in bins this year. So far I'm liking it, but will see when the Kindergartners actually start using them... thanks for a chance to win your cute labels. jcrcis@ yahoo dot com
ReplyDeleteEverything is adorable and sooooo organized! I love it! I am definitely going to have to check those labels out because my art closet is a hot mess!
ReplyDeleteI love to organize with color-coordinated containers and cute labels. (LaurenDewees@gmail.com) You have inspired me to use labels in all the containers above my sink at school. It's amazing how much neater it looks just by placing the label in front.
ReplyDeleteThe Traveling Teacher
You go girl!
ReplyDeleteTanya ☺
First Grade is Fantabulous!
Now you are a woman after my organized heart ;) Your transformation is wonderful! One way that I organize is labeling. I label EVERYTHING. It makes it easier to find things and looks great too! Thanks for sharing :)
ReplyDeletekingdomfirst4@gmail.com
Deleteemail me at justaprimarygirl@yahoo.com for your choice of my labels. You can choose a color and I will send you both square and rectangle. Thanks for your comment! :)
DeleteYahoo! I sure will, thank you :)
DeleteThose labels are adorable!!!
ReplyDeleteKimberly Ann
Live, Laugh, I love Kindergarten
I love your bench seat! I am looking for something similar for myself - may have to be brave like you are!!!
ReplyDeleteHIlary
Kinderland Kuties
All those labels make me happy! My favorite way to organize is by labeling everything, and by sorting all those items into containers. I love finding little bins and boxes at the Dollar Tree, Target, or Ikea! I would be so excited to have a set of these labels!! :)
ReplyDeletekdahlhofer@gmail.com
I too love organizing with labels :)
ReplyDeleteKim
khenry22@aol.com
Go you creating all that!! And awesome job organizing :)
ReplyDeleteAnisa @ Creative Undertakings